
In modern applications, especially microservices, services may silently fail, degrade or lose connection to crucial dependencies.
Without proper monitoring, these issues go undetected until they cause visible downtime, data loss or customer frustration.
Traditional logging and exception handling catches some issues but often times fails to provide proactive insights into the health and responsiveness of services and their dependencies.
Health Checks
Health checks are lightweight diagnostics that verify if your application and its critical components are working as expected.
You can easily verify not only whether the app is running but also whether it can respond properly and access its critical dependencies like databases, caches or external services.
These checks can be used by:
- Load balancers
- Monitoring tools
You can either use third-party health checks or implement your own custom ones.
Additionally, you can integrate a user-friendly UI dashboard to visualize the health check results.
Getting Started
Health Checks are built-in to ASP.NET Core and to get started with them, you need to use AddHealthChecks method to register health check services in the DI.
var builder = WebApplication.CreateBuilder(args);

builder.Services.AddHealthChecks();

var app = builder.Build();

app.MapHealthChecks("/health");
It adds basic infrastructure to report whether the app is healthy. You can extend this to include custom or third party checks.
MapHealthChecks maps an HTTP GET endpoint at /health. To access it simply go to http://host:port/health.
By default this endpoint returns HealthStatus. HealthStatus is an enum that contains:
- Unhealthy - 0
- Degraded - 1
- Healthy - 2
A status of Unhealthy should be considered the default value for a failing health check.
You could also utilize the HealthCheckService to create a custom endpoint if you need:
app.MapGet("/healthz", async (HealthCheckService healthCheckService) =>
{
    var report = await healthCheckService.CheckHealthAsync();
    return Results.Ok(new
    {
        Status = report.Status.ToString(),
        Checks = report.Entries.Select(e => new
        {
            Name = e.Key,
            Status = e.Value.Status.ToString(),
            e.Value.Description
        }),
        Duration = report.TotalDuration
    });
});
CheckHealthAsync runs all the health checks in the application and returns the aggregated status.
Third party health checks
Whether an application is healthy is important but it's equally as important to check if all critical dependencies are healthy as well.
Instead of reinventing the wheel and creating custom health checks, the best way to add checks for your database, cache, broker and others is to use third party libraries for them.
These libraries are designed to work out of the box, saving time and reducing the risk of errors.
In this example, we’ll add health checks for PostgreSQL and Redis. First, let’s install the necessary NuGet packages:
dotnet add package AspNetCore.HealthChecks.NpgSql
dotnet add package AspNetCore.HealthChecks.Redis
Next, register the health checks in your service container:
builder.Services
    .AddHealthChecks()
    .AddNpgSql(configuration.GetConnectionString("Postgres")!)
    .AddRedis(configuration.GetConnectionString("Redis")!);
That’s it, no need to write custom logic. These methods handle the connection checks for you automatically.
Formatter
By default, hitting the health endpoint returns a very minimal response:
HealthyWhile this is fine for basic checks, it's not very helpful for monitoring tools. To address this issue and improve the output, we need to install the additional NuGet package:
dotnet add package AspNetCore.HealthChecks.UI.ClientNow we can update the endpoint configuration to include a structured response:
app.MapHealthChecks("/health", new HealthCheckOptions
{
    ResponseWriter = UIResponseWriter.WriteHealthCheckUIResponse
});
The UIResponseWriter.WriteHealthCheckUIResponse method automatically formats the response into a structured JSON object that includes the status of each registered check:
{
  "status": "Healthy",
  "totalDuration": "00:00:00.0032405",
  "entries": {
    "Custom": {
      "data": {

      },
      "description": "Everything is OK",
      "duration": "00:00:00.0000970",
      "status": "Healthy",
      "tags": []
    },
    "npgsql": {
      "data": {

      },
      "duration": "00:00:00.0030782",
      "status": "Healthy",
      "tags": []
    },
    "redis": {
      "data": {

      },
      "duration": "00:00:00.0009477",
      "status": "Healthy",
      "tags": []
    }
  }
}
HealthChecks UI
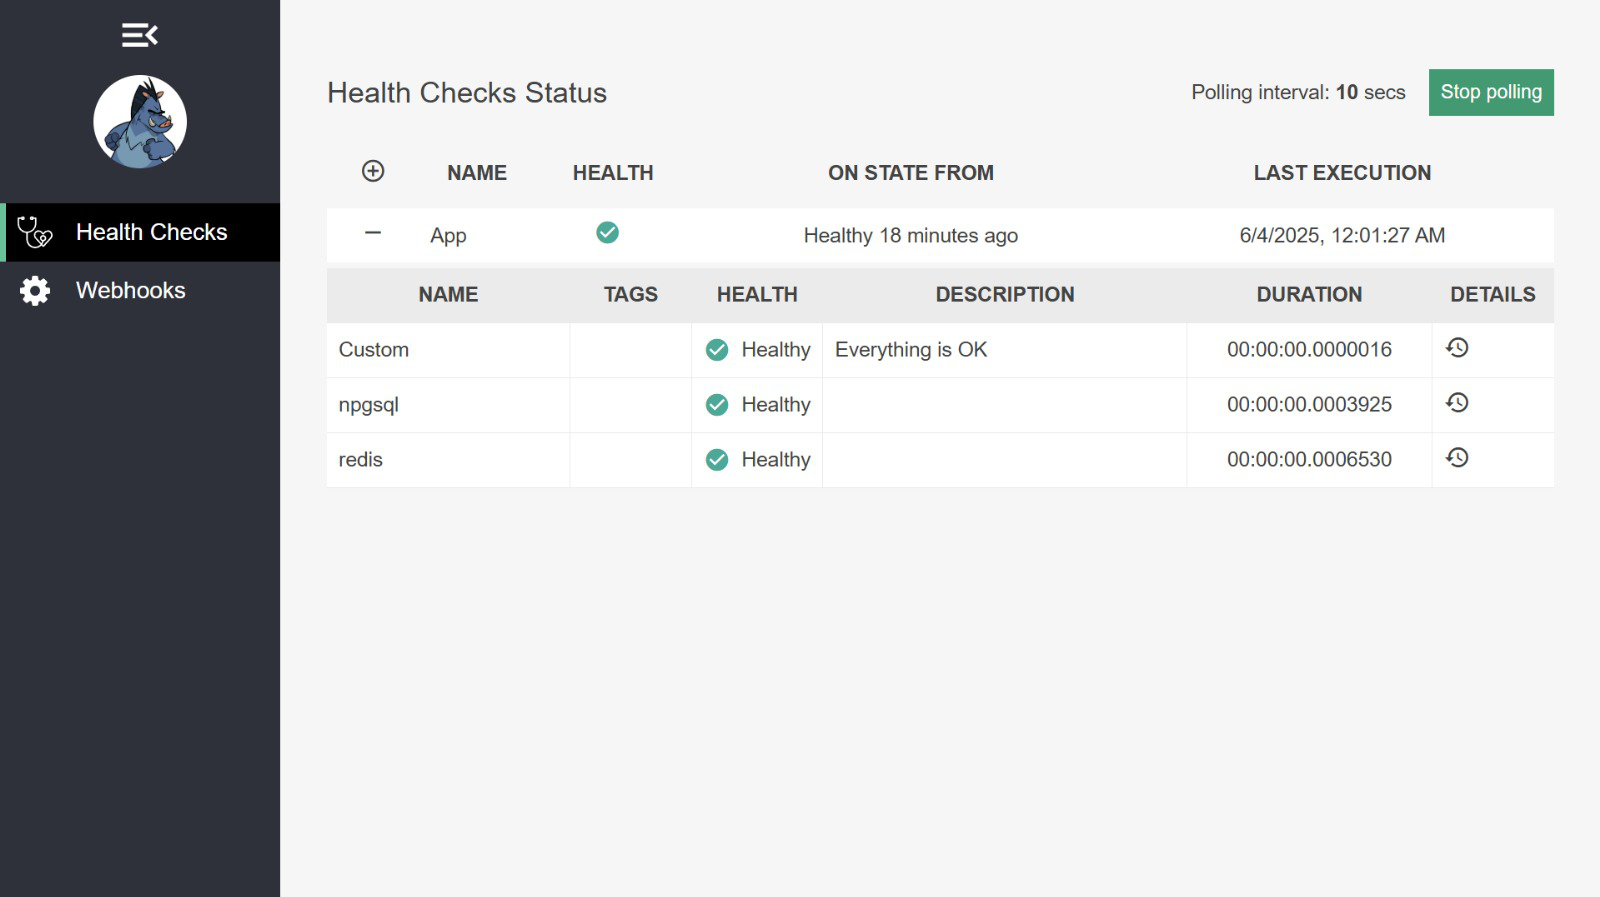
With the response formatter in place, we’re just one step away from adding a health checks UI dashboard to visualize the status of our application and its dependencies.
To enable the dashboard, install the main UI package:
dotnet add package AspNetCore.HealthChecks.UIFor storing health check history, you can use various solutions (SQL Server, PostgreSQL, etc.). In this example, we'll use in-memory storage for simplicity:
dotnet add package AspNetCore.HealthChecks.UI.InMemory.StorageTo configure the health checks UI and register your health endpoint:
builder.Services.AddHealthChecksUI(options =>
{
    options.AddHealthCheckEndpoint("App", "http://webapi:8080/health");
}).AddInMemoryStorage();
Finally, map the dashboard to a route in your app:
app.MapHealthChecksUI(options =>
{
    options.UIPath = "/health-ui";
});
Now, when you navigate to /health-ui, you’ll see a real-time dashboard showing the health status of your application and all configured dependencies:
Custom health checks
While built-in and third-party health checks cover most scenarios, sometimes you need to check something specific. In such cases, you need to implement your own health check.
To create a custom health check implement the IHealthCheck interface and define your own logic inside the CheckHealthAsync method:
public class CustomHealthCheck : IHealthCheck
{
    public Task<HealthCheckResult> CheckHealthAsync(
        HealthCheckContext context,
        CancellationToken cancellationToken = default)
    {
        var isHealthy = CheckSomething();

        return Task.FromResult(isHealthy
            ? HealthCheckResult.Healthy("Everything is OK")
            : HealthCheckResult.Unhealthy("Something went wrong"));
    }

    private bool CheckSomething() => true; // Replace with real logic
}
Once your class is implemented, register it in the DI container using the AddCheck method:
builder.Services
    .AddHealthChecks()
    .AddCheck<CustomHealthCheck>("Custom")
    .AddNpgSql(configuration.GetConnectionString("Postgres")!)
    .AddRedis(configuration.GetConnectionString("Redis")!);
Now your custom logic will run alongside the other health checks and will appear in both the /health endpoint and the UI dashboard.
Conclusion
Health checks are a simple yet powerful feature built into ASP.NET Core.
You can easily monitor the health and availability of your application and its critical dependencies.
With minimal setup, you can:
- Expose basic health endpoints
- Monitor dependencies
- Customize output formats
- Add a dedicated dashboard
If you want to check out examples I created, you can find the source code here:
Source CodeI hope you enjoyed it, subscribe and get a notification when a new blog is up!