When building applications that handle user interactions, implementing proper authorization is a common requirement.
Without it, users could access sensitive data or perform actions beyond their permissions, leading to unwanted behavior.
To address this, applications need to control access based on user responsibilities. The simplest way to achieve this is role-based authorization.
Role-based authorization
Role-based authorization is a security mechanism that grants access based on predefined roles rather than managing permissions for individual users.
Instead of assigning permissions to each user separately, users are grouped into roles, with each role defining a specific set of permissions.
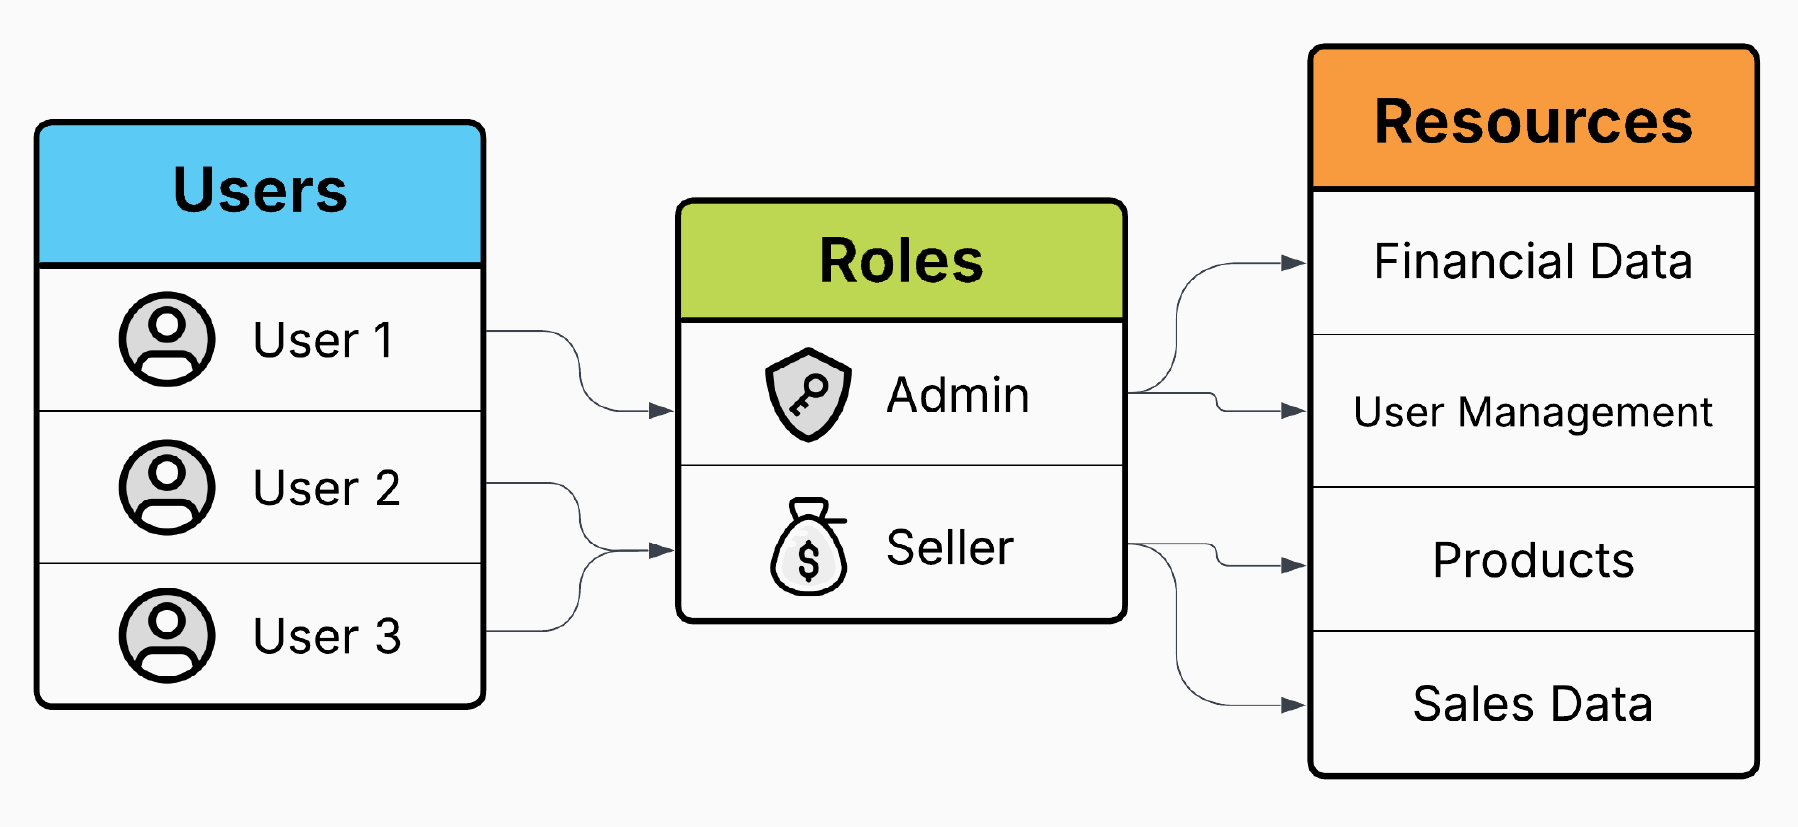
When a user logs in, the system determines their role and enforces access restrictions accordingly.
This ensures that users can only interact with resources necessary for their responsibilities, improving security and maintainability.
Prerequisites
Before enforcing role-based authorization, authentication must be in place.
In this example, we'll use JWT authentication in our API and include roles as claims within the JWT to manage authorization.
If you're not familiar with how to implement it, check out this guide: JWT Authentication
Entities
With authentication set up, the User entity should look like this:
public sealed class User
{
    public Guid Id { get; set; }

    public string Email { get; set; }

    public string Password { get; set; }

    public string FirstName { get; set; }

    public string LastName { get; set; }

    public User(
        string email,
        string password,
        string firstName,
        string lastName)
    {
        Id = Guid.NewGuid();
        Email = email;
        Password = password;
        FirstName = firstName;
        LastName = lastName;
    }
}
Next step is to define Role entity, here’s a simple example of a Role entity:
public sealed class Role
{
    public int Id { get; set; }

    public string Name { get; set; }

    public Role(int id, string name)
    {
        Id = id;
        Name = name;
    }
}
For roles, the entity only needs an id and a name.
To be able to add and remove roles dynamically, we need to create a UserRole entity as well:
public class UserRole
{
    public Guid UserId { get; set; }

    public int RoleId { get; set; }

    public User User { get; set; }

    public Role Role { get; set; }

    public UserRole(Guid userId, int roleId)
    {
        UserId = userId;
        RoleId = roleId;
    }
}
However, if dynamic role management is not needed, simply adding navigation properties between the User and Role tables will suffice, EF Core will automatically create UserRole table for you.
I will explicitly define UserRole table for this blog post, if role management is not needed in your use case, the code snippets will be very similar, with just a slight difference.
With the models in place, we can configure them and their relationships as follows:
public sealed class RoleConfiguration : IEntityTypeConfiguration<Role>
{
    public void Configure(EntityTypeBuilder<Role> builder)
    {
        builder.ToTable(TableNames.Roles);

        builder.HasKey(u => u.Id);

        builder.Property(u => u.Name)
            .IsRequired()
            .HasMaxLength(100);
    }
}public sealed class UserConfiguration : IEntityTypeConfiguration<User>
{
public void Configure(EntityTypeBuilder<User> builder)
{
builder.ToTable(TableNames.Users);
builder.HasKey(u => u.Id);
builder.Property(u => u.Id)
.IsRequired();
builder.Property(u => u.Email)
.IsRequired()
.HasMaxLength(255);
builder.Property(u => u.Password)
.IsRequired()
.HasMaxLength(100);
builder.Property(u => u.FirstName)
.IsRequired()
.HasMaxLength(100);
builder.Property(u => u.LastName)
.IsRequired()
.HasMaxLength(100);
}
}public sealed class UserRoleConfiguration : IEntityTypeConfiguration<UserRole>
{
public void Configure(EntityTypeBuilder<UserRole> builder)
{
builder.ToTable(TableNames.UserRoles);
builder.HasKey(u => new { u.UserId, u.RoleId });
builder.HasOne(u => u.User)
.WithMany()
.HasForeignKey(u => u.UserId)
.OnDelete(DeleteBehavior.Cascade);
builder.HasOne(u => u.Role)
.WithMany()
.HasForeignKey(u => u.RoleId)
.OnDelete(DeleteBehavior.Cascade);
}
}Updating Business Logic
Now that we set up the database, we can update business logic. Particuallary, we should be interested in registration and login flows.
When registering a new user we need to create UserRole alongside creation of a new user:
var user = new User(
    Guid.NewGuid(),
    request.Email,
    hashedPassword,
    request.FirstName,
    request.LastName,
    DateTime.UtcNow);

dbContext.Users.Add(user);

var userRole = new UserRole(user.Id, Role.SellerId);

dbContext.UserRoles.Add(userRole);

await dbContext.SaveChangesAsync(cancellationToken);
This will create a new user and a new user role with the seller role.
In the login flow, we have a JwtGenerator service responsible for generating JWT tokens:
public interface IJwtGenerator
{
    Task<string> GenerateToken(Guid id, string email);
}
GenerateToken method should now need to fetch the users roles from the database and include them in the tokens claims:
public async Task<string> Generate(Guid id, string email)
{
     var securityKey = new SymmetricSecurityKey(Encoding.UTF8.GetBytes(_jwtOptions.Secret));

     var credentials = new SigningCredentials(securityKey, SecurityAlgorithms.HmacSha256);

     var roleClaims = await _dbContext.UserRoles
         .Where(x => x.UserId == id)
         .Select(x => new Claim(ClaimTypes.Role, x.Role.Name))
         .ToListAsync();

     List<Claim> claims = [
         new(JwtRegisteredClaimNames.Sub, id.ToString()),
         new(JwtRegisteredClaimNames.Email, email)
     ];

     claims.AddRange(roleClaims);

     var tokenDescriptor = new SecurityTokenDescriptor
     {
         Subject = new ClaimsIdentity(claims),
         SigningCredentials = credentials,
         Issuer = _jwtOptions.Issuer,
         Audience = _jwtOptions.Audience,
         Expires = DateTime.UtcNow.AddMinutes(_jwtOptions.ExpiresInMinutes)
     };

     var handler = new JsonWebTokenHandler();

     return handler.CreateToken(tokenDescriptor);
}
This implementation ensures that each JWT includes the necessary user details along with their assigned roles.
Applying Authorization to Endpoints
The final step is applying roles to the endpoints.
If you're using controllers, you'll use the Authorize attribute. The Authorize attribute will enforce authentication and authorization for your controller or endpoint.
[Route("api/[controller]")]
public sealed class ProductsController : BaseController
{
    [HttpPost]
    [Authorize(Roles = Role.Seller)]
    [ProducesResponseType(typeof(Guid), StatusCodes.Status200OK)]
    [ProducesResponseType(StatusCodes.Status403Forbidden)]
    public async Task<IActionResult> Create(CreateProductRequest request, CancellationToken cancellationToken)
    {
        var command = request.Adapt<CreateProductCommand>();

        var response = await Sender.Send(command, cancellationToken);

        return Ok(response);
    }

    // ...
}
Within the Authorize attribute, the Roles parameter further restricts access, allowing only users who have the specified roles.
If a user is not authenticated or doesn't have the required role, they will receive a 403 Forbidden response.
For Minimal APIs, the situation is similar.
Instead of the Authorize attribute, the RequireAuthorization method is used to restrict access to users with the specified role:
public sealed class CreateEndpoint : IEndpoint
{
    public void MapEndpoint(IEndpointRouteBuilder app)
    {
        app.MapPost("products/", async (ISender sender, CreateRequest request, CancellationToken cancellationToken) =>
        {
            var command = request.Adapt<CreateProductCommand>();

            var response = await sender.Send(command, cancellationToken);

            return Results.Ok(response.Value);
        })
        .WithTags(Tags.Products)
        .RequireAuthorization(policy => policy.RequireRole(Role.Seller));
    }
}
Conclusion
Role-based authorization is a powerful and efficient method of managing user access in your application.
By associating users with specific roles, we can enforce access restrictions, ensuring that users only have access to the resources and actions they’re authorized to interact with.
I hope you enjoyed this type of blog post, where we build on previous topics and continue exploring further.
If you want to check out examples I created, you can find the source code here:
Source CodeI hope you enjoyed it, subscribe and get a notification when a new blog is up!