When developing an application, it's crucial to ensure stability and reliability.
As development progresses, bugs will emerge and existing functionality may break, leading to longer development time and reduced confidence in changes.
To address these challenges, tests can be created to verify that the code works correctly, ensuring stability, maintainability and efficiency.
One of the simplest and most effective ways to validate your logic is by writing unit tests.
Unit Tests
Unit tests are automated tests that evaluate individual units of software in isolation. A unit refers to the smallest testable part of an application, typically a function or method.
Compared to other types of tests, such as integration testing, unit tests run much faster and more cost-effective.
Unit tests can help with regression by letting you rerun tests after each build or code change, ensuring new code doesn't break existing functionality.
They can also be viewed as a form of documentation if the tests clearly define the expected output for a given input.
Writing tests for your code will naturally decouple your code, because it would be more difficult to test otherwise.
.NET provides several robust frameworks for unit testing:
- xUnit
- NUnit
- MSTest
- TUnit
xUnit is my preferred testing framework, and I use it regularly.
TUnit is a promising alternative, and I can see myself switching to it exclusively in the future. However, it hasn't reached its v1 release yet.
To learn more about TUnit, check out my blog post.
Getting Started
To begin with unit testing, you need to set up a test project. I will create a xUnit test project:
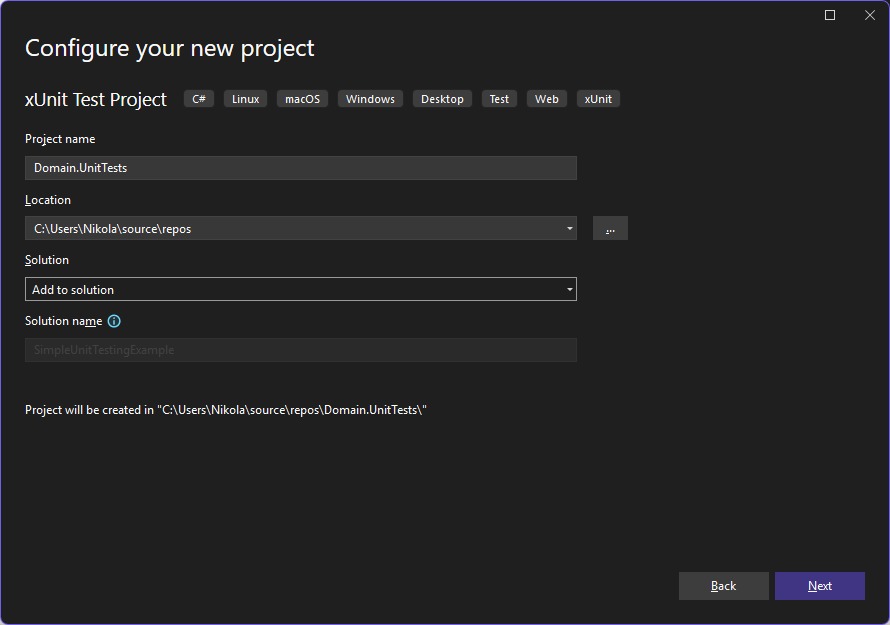
I organize my test projects based on the projects I want to test.
For instance, if I'm testing the Domain project, I will create a Domain.UnitTests project. This approach makes it easier to navigate and manage tests.
Simple Tests
In the Domain project, we have the Product entity, which will be used for our first unit tests:
public sealed class Product
{
    public Guid Id { get; set; }
    public string Name { get; set; }
    public string Description { get; set; }
    public decimal Price { get; set; }
    public ProductStatus Status { get; set; }

    public Product(Guid id, string name, string description, decimal price)
    {
        Id = id;
        Name = name;
        Description = description;
        Price = price;
        Status = ProductStatus.Created;
    }

    public void Publish()
    {
        if (Status == ProductStatus.Published)
        {
            throw new Exception($"Product with {Id} has already published.");
        }

        Status = ProductStatus.Published;
    }
}
The Product is a simple entity with a few properties, a constructor and some basic methods.
To unit test this entity, I will create a test file named ProductTests (matching the class name being tested) with a Tests suffix. This is part of my standard routine for creating test files.
Test classes should be public and unit tests are simply methods decorated with the appropriate xUnit attributes.
With xUnit, you can create unit tests using attributes, such as [Fact] and [Theory].
To keep this introduction straightforward, we will focus only on creating unit tests using the [Fact] attribute:
public class ProductTests
{
    [Fact]
    public void Publish_ShouldPublishProduct_WhenProductStatusIsNotPublished()
    {
        // Arrange
        var product = new Product(
            Guid.NewGuid(),
            "Name",
            "Description",
            123);

        // Act
        product.Publish();

        // Assert
        Assert.Equal(ProductStatus.Published, product.Status);
    }
}
As I mentioned earlier, test names should be descriptive to clearly communicate what is being tested, the expected outcome and the conditions under which the test applies.
The naming convention I follow for tests is MethodName_Should..._When.... Another popular approach is When..._Then..., among others.
Regardless of which convention you choose, consistency is key.
You may also notice the comments in the test. This follows the AAA (Arrange-Act-Assert) pattern, which is a widely used convention for structuring unit tests:
- Arrange: Set up the necessary objects and state. In this case, we create a new product, which is unpublished by default.
- Act: Perform the action being tested. Here, we call Publish() on the product.
- Assert: Verify the expected outcome. We check if the product’s status is now Published.
This structure makes tests easier to read and understand while maintaining a clear separation of concerns.
Handling Exceptions
Another interesting example would be handling exceptions:
[Fact]
public void Publish_ShouldThrowException_WhenProductHasAlreadyPublished()
{
    // Arrange
    var product = new Product(
        Guid.NewGuid(),
        "Name",
        "Description",
        123);

    product.Publish();

    // Act
    var exception = Assert.Throws<InvalidOperationException>(() => product.Publish());

    // Assert
    Assert.Equal($"Product with {product.Id} has already published.", exception.Message);
}
In this example, we'll test that an exception is thrown when trying to publish a product that has already been published.
Assert.Throws method is used to verify that a specific exception is thrown during the execution of a method.
It essentially treats our method as a delegate, invoking it to check if the expected exception is thrown and capturing it.
If the expected exception is not thrown, the test will fail. If the exception is successfully captured, you can inspect its details further.
Assertions
When we wrote our first test, I used the built-in assertions from the static Assert class.
Using Assert is fine, but there are better alternatives that offer improved readability and expressiveness. With third-party libraries in case of a failure, the error messages are more user-friendly, and overall, these alternatives make writing assertions easier.
Older blogs often recommend FluentAssertions and it is a great library, but as of version 8, it's no longer free for commercial use, costing around $130 per developer..
So, I've decided to use Shouldly. It offers clear and expressive syntax for assertions while remaining free. By the way, I support monetizing work, but pricing.ShouldBe(fair).
Here’s an updated example of our test using assertions with Shouldly:
[Fact]
public void Publish_ShouldPublishProduct_WhenProductStatusIsNotPublished()
{
    // Arrange
    var product = new Product(
        Guid.NewGuid(),
        "Name",
        "Description",
        123);

    // Act
    product.Publish();

    // Assert
    product.Status.ShouldBe(ProductStatus.Published);
}
Mocking
Mocks are essential for creating unit tests.
In the previous example, we tested a simple class without dependencies. By using mocks, we can simulate dependencies and their behaviors, effectively isolating the unit under test.
Popular options in .NET:
- Moq
- NSubstitute
In the next test, we’ll demonstrate how to use mocks with Moq.
Unit Testing With Mocks
In the Business project, I have the use case handlers, which will be utilized in our first unit tests with mocks. Here's an example of the product publishing use case:
internal sealed class PublishProductCommandHandler(
    IApplicationDbContext dbContext) : IRequestHandler<PublishProductCommand, Result>
{
    public async Task<Result> Handle(PublishProductCommand request, CancellationToken cancellationToken)
    {
        var product = await dbContext.Products
            .FirstOrDefaultAsync(x => x.Id == request.Id, cancellationToken);

        if (product is null)
        {
            return Result.NotFound($"Product with specified id {request.Id} is not found.");
        }

        product.Publish();

        await dbContext.SaveChangesAsync(cancellationToken);

        return Result.Success();
    }
}
Another important point to note is that the handler class is marked as internal, meaning it can't be accessed in your tests. The solution is to add a new assembly attribute to your business project:
<ItemGroup>
    <AssemblyAttribute Include="System.Runtime.CompilerServices.InternalsVisibleToAttribute">
	<_Parameter1>Business.UnitTests</_Parameter1>
    </AssemblyAttribute>
</ItemGroup
This will make all internal members of your assembly visible to your test project.
Now let's take a look at unit tests using Moq.
To properly create a test that requires the PublishProductCommandHandler, we first need to create a mock of the IApplicationDbContext interface:
public class PublishProductCommandHandlerTests
{
    private readonly Mock<IApplicationDbContext> _applicationDbContextMock;

    public PublishProductCommandHandlerTests()
    {
        _applicationDbContextMock = new Mock<IApplicationDbContext>();
    }
}
In the Arrange part of the test, you need to set up the necessary conditions for the test to run correctly. Here's a breakdown of the Arrange section in our test:
// Arrange
var product = new Product(
    Guid.NewGuid(),
    "Name",
    "Description",
    123);

var command = new PublishProductCommand(product.Id);

_applicationDbContextMock.Setup(db => db.Products).ReturnsDbSet([product]);

var commandHandler = new PublishProductCommandHandler(_applicationDbContextMock.Object);
_applicationDbContextMock.Setup(db => db.Products) is telling Moq to set up the Products property of the mocked IApplicationDbContext. Now when you ask for products it will return passed collection in our method.
Rest of the test looks as usual:
[Fact]
public async Task Handle_ShouldPublishProduct_WhenProductWasNotPublished()
{
    // Arrange
    var product = new Product(
        Guid.NewGuid(),
        "Name",
        "Description",
        123);

    var command = new PublishProductCommand(product.Id);

    _applicationDbContextMock.Setup(db => db.Products).ReturnsDbSet([product]);

    var commandHandler = new PublishProductCommandHandler(_applicationDbContextMock.Object);

    // Act
    var result = await commandHandler.Handle(command, default);

    // Assert
    result.IsSuccess.ShouldBeTrue();
    _applicationDbContextMock.Verify(x => x.SaveChangesAsync(It.IsAny<CancellationToken>()), Times.Once);
}
In addition to testing that the result indicates success, we can also verify whether SaveChangesAsync was called on our mocked instance and how many times it was invoked.
Conclusion
Unit testing is essential for maintaining code stability, preventing regressions, and ensuring confidence in changes.
By leveraging frameworks like xUnit and tools like Moq we can easily write effective and maintainable tests.
This is just an introduction to unit tests. In the upcoming blog posts, you can expect a continuation where we will cover parameterized unit tests as well as integration tests.
One of the improvements I also plan to cover is using Bogus for generating test data.
If you want to check out examples I created, you can find the source code here:
Source CodeI hope you enjoyed it, subscribe and get a notification when a new blog is up!